Create a Flappy Bird Clone With Python P3
Posted in tutorials python -This is one part of a multi-part tutorial. To see other posts in the same series, please click below:
Part 4 - Make a “flapping” flappy bird
Part 3: Start making the game
Now that we know briefly how pygame works, let’s dive deeper in and start making our Flappy Bird game.
First things first, we need some images of the bird, the background and the tubes. As I mentioned in the first post of this series, I did make this game for Android a few years ago, so I should still have those lying around somewhere in my messy backup system. But since looking for my assets would likely to take more time, let’s search for them in the Internet for faster result.
We can, of course, search for every one of the images, one by one, but since Flappy Bird is quite a famous game, I’d bet that someone out there has already done that. Let’s type "flappy bird assets" on Google to see if we find something.
Indeed, I found this Github repo that someone has collected not just images, but also sounds and other things. This should be enough for us to get started.
Click on the green button that says Code (it used to be call Clone, but Github recently changed it). Now you can choose to cloning the whole repo, using git clone, but since we will also use git to version control our project, it may complicate things (technically, you can also use git submodule, but maybe that’s too much git kool-aid to drink in one day), for now let’s just click on Download ZIP.
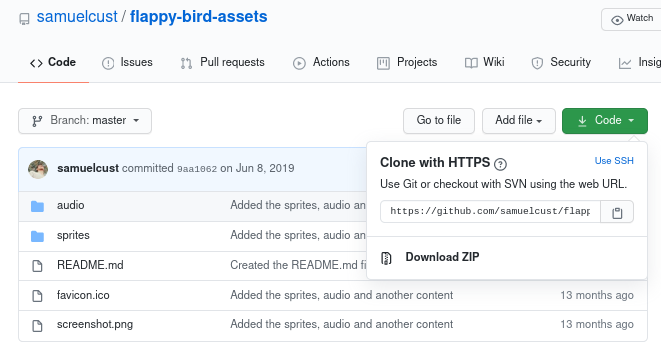
Download the ZIP file with __Code__ button
The browser will download a zip file called flappy-bird-assets-master.zip to your system. Just accepts the download and wait a few secs for the process to finish. Now if you’re on Linux or MacOS, there’s this cool thing you can try: since the zip file was download to ~/Download, from the flappybird directory, you can type unzip ~/Download/flappy-bird-assets-master.zip, and the unzipped flappy-bird-assets-master folder will be visible in your current directory. Quite much neater than copy the file and right click and unzip, eh?
Let’s examine the structure of the new folder: It has a folder called sprites, another called audio, a favicon.ico, a README.md and a screenshot.png.
By experience, I know that those three files don’t have the stuff I need (you are free to examine them as you wish), and audio seems to contain all the audio files, so sprites should be what we want to examine first. Normally I’ll use the terminal to ls the directory, but since it’s images we want to look for, maybe using the file browser is better as we can see the thumbnails.
The sprites
So it seems we have three different birds, two types of background, two types of pipes, several numbers (for scores) and even a “Game Over” sign. Neat! Let’s move this sprites directory to our main directory, and at the same time changes its name to images, for easy use:
mv flappy-bird-assets-master/sprites images
Also, copy the intro.py to flappybird.py and open it with your editor:
cp intro.py flappybird.py
First thing we want to do is to try loading a bird image, instead of a ball. This should be easy, we can just replace the link to the ball with the link to the bird image. Perhaps we’ll change the variable names to bird and birdRect, too.
Notice that in here we have nine images of three different birds: red, blue and yellow birds, each with an upflap, a downflap and a midflap. These are for conveniently creating flapping effect later on (remember, we can create “movements” by changing the image in different frame), but for now, as we just want to test things out, let’s simply load one random image. I’m gonna choose redbird-upflap.
Our file now looks like this
import sys, pygame
pygame.init()

size = width, height = 320, 240
black = 0, 0, 0

screen = pygame.display.set_mode(size)

bird = pygame.image.load("images/redbird-upflap.png")
birdrect = bird.get_rect()

while 1:
    for event in pygame.event.get():
        if event.type == pygame.QUIT: sys.exit()

    screen.fill(black)
    screen.blit(bird, birdrect)
    pygame.display.flip()
Now as we run python flappybird.py, we get a red bird floating and doing nothing in the top left of a black screen.
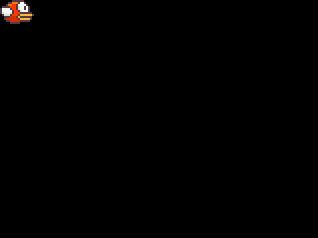
We succeed, but the bird lying there looks kinda bad, let’s find a way to move it down abit. Since screen.blit seems to be where the image gets drawn, we should check out its documentation first to see if it allows custom position of the image.
Using the search field in Pygame documentation, here is what I found:
 blit()
    draw one image onto another
    blit(source, dest, area=None, special_flags=0) -> Rect

    Draws a source Surface onto this Surface. The draw can be positioned with the dest argument. Dest can either be pair of coordinates representing the upper left corner of the source. A Rect can also be passed as the destination and the topleft corner of the rectangle will be used as the position for the blit. The size of the destination rectangle does not effect the blit.
So from this short text, we can understand that the birdrect is actually the destination of the drawing here. If we pass an optional position in place of birdrect, we can draw the bird anywhere we want.
If you’ve ever seen FlappyBird, you will know that the bird is supposed to be in the vertical middle and on the horizontal left of the screen, so perhaps the custom position we’re looking for is (0, height/2)?
Not quite. If you think about it, the dest we put in will be the top left of the image, so if we put the top left of the bird at the middle of the screen, it will actually lie on the bottom half. For the bird to lie at exactly the middle of the screen, its center must be at the screen center, which means its top-left must be half of its height from the screen center. The position we should aim to, therefore, must be calculated by screen_height/2 - bird_height/2, so we need some way to determine the size of the bird image first
Luckily, putting “image size” into the search box gives us what we need:
 get_height()
    get the height of the Surface
    get_height() -> height

    Return the height of the Surface in pixels.
We also have get_width, which returns width and get_size for both width and height, but perhaps height is enough here. Applying the formula that we had earlier, the code will look like this:
import sys, pygame
pygame.init()

size = width, height = 320, 240
black = 0, 0, 0

screen = pygame.display.set_mode(size)

bird = pygame.image.load("images/redbird-upflap.png")
bird_height = bird.get_height()
bird_y_pos = height/2 - bird_height/2

while 1:
    for event in pygame.event.get():
        if event.type == pygame.QUIT: sys.exit()

    screen.fill(black)
    screen.blit(bird, (0, bird_y_pos))
    pygame.display.flip()
Here we removed the birdrect, which is no longer needed. And the position is calculated outside of the loop, so it happens only once. As the bird will stay still through out the game, we don’t need to re-calculate the bird’s position for every iteration.
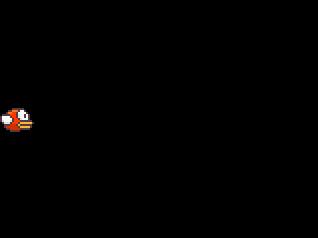
And when we run, we get a nice bird in the middle of the screen. This may not look like much, but we’ve actually worked with the documentation and figured it out. Good progress!
There’s one more thing before we end this post. As I run the code, I get this little warning:
flappybird.py:19: DeprecationWarning: an integer is required (got type float).  Implicit conversion to integers using __int__ is deprecated, and may be removed in a future version of Python.
  screen.blit(bird, (0, bird_y_pos))
Basically, it says that the bird_y_pos is a float, and the blit function requires an integer. For now, an implicit conversion from float to integer is done by Pygame, but they will drop that conversion in a future version (i.e. if you run the code in a future version of Pygame, it’s likely that it will not work).
In this case, the issue can be solved easily by perform the conversion ourselves:
bird_y_pos = int(height/2 - bird_height/2)
And we get rid of the warning.
Next time, let’s make it more like a game!
To see other posts in the same series, please click below: